
A Guide to Wort Chilling in Homebrewing
Wort chilling is a crucial step in homebrewing that rapidly cools your boiled wort to a temperature suitable for fermentation. Proper cooling helps prevent contamination, minimizes the risk of off-flavors caused by dimethyl sulfide (DMS), and enhances cold break formation for clearer beer. There are several methods to chill wort, each with its advantages and drawbacks. In this guide, we’ll explore the most common types of wort chillers – immersion, counterflow, and plate chillers – along with a brief look at no-chill brewing.
Types of Wort Chillers
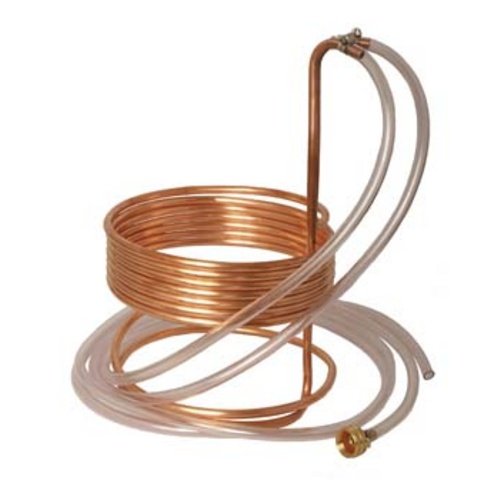
Immersion Chiller
Immersion chillers are the simplest and most common type of wort chiller, especially among beginner and intermediate homebrewers. These consist of a coiled metal tube (usually copper or stainless steel) that is submerged directly into the hot wort. Cold water is then circulated through the coil, absorbing heat and carrying it away.
Pros:
- Easy to use and clean
- Less risk of contamination since wort remains in the kettle
- Affordable and widely available
Cons:
- Slower cooling compared to other methods
- Requires a significant amount of cooling water
- Less efficient for large batches
Brewer’s Tip: Stirring the wort while using an immersion chiller can significantly speed up cooling by moving hot wort against the coils rather than letting it sit stagnant.
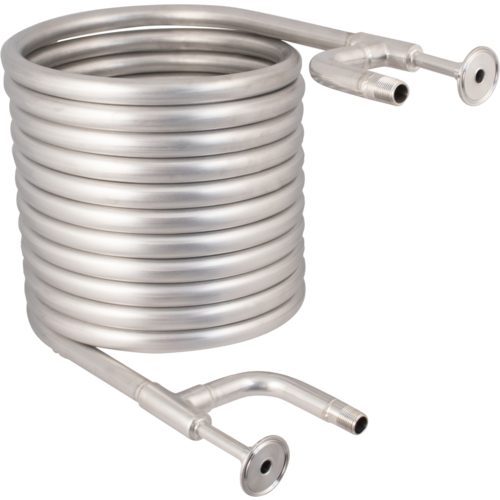
Counterflow Chiller (CFC)
Counterflow chillers are more efficient than immersion chillers. They consist of two tubes – one inside the other – where hot wort flows in one direction while cold water flows in the opposite direction, maximizing heat exchange.
Pros:
- Faster cooling times compared to immersion chillers
- Uses less water per gallon of wort cooled
- Suitable for larger batches
Cons:
- More complex setup
- Requires thorough cleaning to prevent clogging
- Higher cost than immersion chillers
Brewer’s Tip: If you use a counterflow chiller, consider installing a hop filter or trub dam in your kettle to prevent hop debris from clogging the tubing. I learned this lesson the hard way after dealing with a clogged chiller on a hoppy IPA batch!
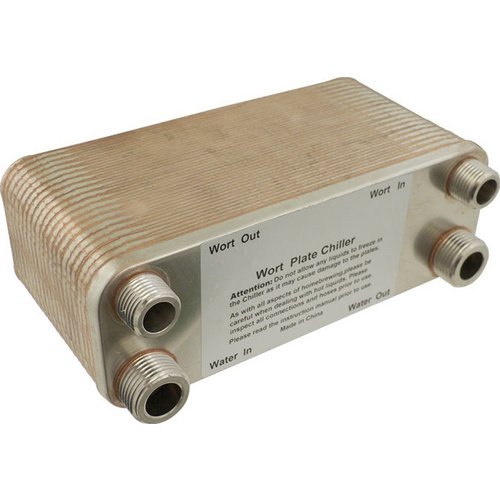
Plate Chiller
Plate chillers are highly efficient and work similarly to counterflow chillers, but use multiple thin plates to maximize surface area for heat exchange. Wort flows through alternating plates while cold water flows in the opposite direction, resulting in rapid chilling.
Pros:
- Extremely fast cooling, even for large batches
- Compact and space-saving design
- Highly efficient water usage
Cons:
- More expensive than other options
- Prone to clogging if not properly filtered before use
- Requires diligent cleaning and sanitization
Brewer’s Tip: After every brew session, I run a hot PBW (Powdered Brewery Wash) solution through my plate chiller, followed by a thorough rinse and sanitization with Star San. This routine prevents buildup and contamination.
No-Chill Brewing
For brewers who want to conserve water or lack a wort chiller, the no-chill method is an alternative. This technique involves transferring hot wort into a sanitized, heat-resistant container (often a plastic cube or fermenter) and allowing it to cool naturally over time.
Pros:
- Saves water and energy
- Simple and requires no extra equipment
- Eliminates risk of contamination from chillers
Cons:
- Can lead to increased DMS if wort is not boiled properly
- Requires adjustments to hop additions since hop utilization continues at high temperatures
- Longer cooling times can delay yeast pitching
Brewer‘s Tip: If you try no-chill brewing, consider adjusting your hop schedule to account for continued isomerization at high temperatures. I’ve found that reducing flameout hops or moving them to a hop stand at 170°F (77°C) helps maintain aroma without excessive bitterness.
Troubleshooting Common Wort Chilling Issues
Even with a solid chilling setup, problems can arise. Here are some common issues and how to fix them:
1. Chilling Takes Too Long
Possible Causes:
- Warm tap water temperature (especially in summer)
- Poor water flow through the chiller
- Lack of wort movement (for immersion chillers)
Solutions:
- Use pre-chilled water by running it through an ice bath before it reaches the chiller
- Increase water flow rate if using an immersion or counterflow chiller
- Stir the wort or whirlpool while chilling to speed up heat transfer
2. Plate or Counterflow Chiller Clogging
Possible Causes:
- Excessive hop debris or trub entering the chiller
- Lack of proper cleaning after previous brews
Solutions:
- Use a hop spider or bag to reduce hop material in the wort
- Install a trub dam or filter in your boil kettle
- Flush the chiller immediately after use with hot water and cleaning solution
3. Leaks in Chiller Connections
Possible Causes:
- Loose hose clamps or poorly connected fittings
- High water pressure causing leaks
Solutions:
- Check all connections before use and tighten clamps if necessary
- Use high-quality, heat-resistant tubing
- Reduce water pressure if necessary
4. Water Wastage Concerns
Possible Causes:
- High water usage, especially with immersion chillers
- Running water continuously without reuse
Solutions:
- Collect used chiller water for cleaning or gardening
- Use a pre-chiller (a coil submerged in an ice bath before the main chiller) to improve efficiency
- Consider a counterflow or plate chiller for better water conservation
Choosing the Right Wort Chilling Method
The best wort chilling method depends on your brewing setup, batch size, budget, and water availability:
- Immersion chillers are great for beginners and small batches.
- Counterflow and plate chillers offer faster cooling for larger systems.
- No-chill brewing is a practical, low-tech alternative for water-conscious brewers.
Whichever method you choose, proper cleaning and sanitation are key to preventing contamination and ensuring high-quality beer.
What’s your go-to wort chilling method? Have you encountered any challenges or found creative solutions? Share your experiences in the comments!